Link
https://awetton.itch.io/no-mana-no-problem
Overview
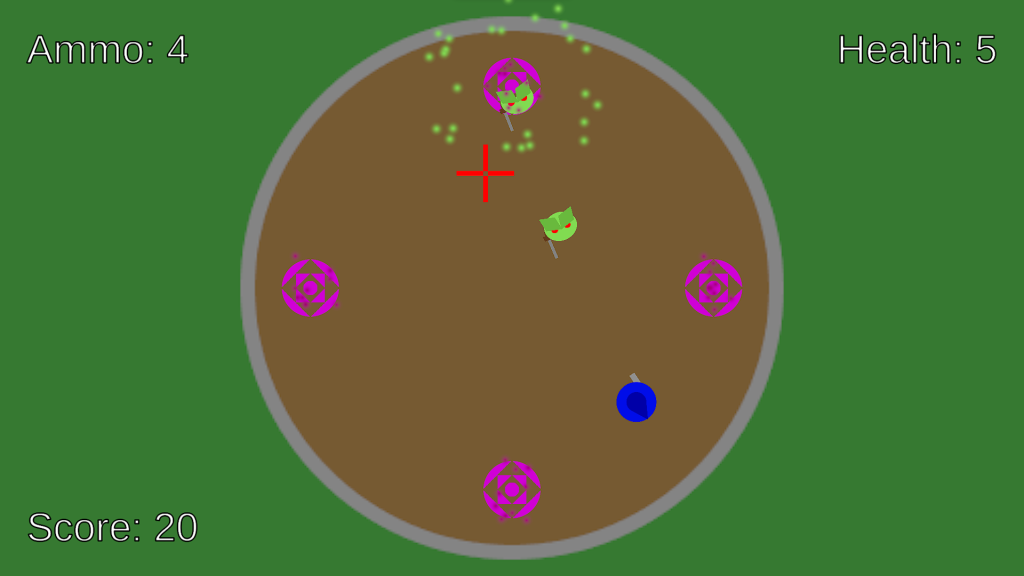
In this top down shooter, enemies spawn from 4 spawning circles on the edges of a wizard’s tower, and the player has to dodge and shoot them without getting hit. As the game goes on, different types of enemies spawn, with different effects/abilities which make it harder to stay alive.
Cursor
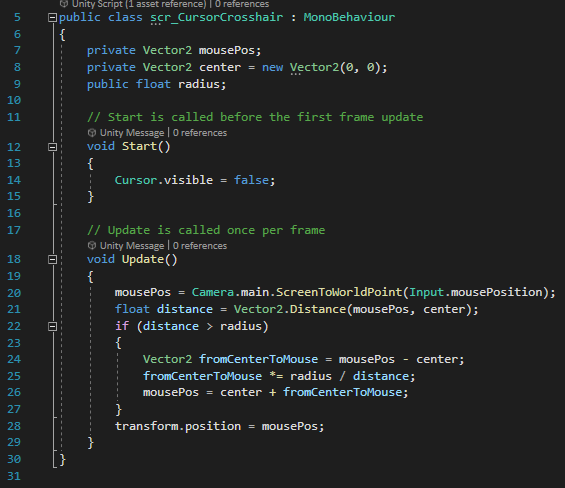
The cursor is replaced by a crosshair to better indicate where the player is aiming. This is done by disabling the cursor when the game starts, and then moving the crosshair object to the position of the cursor, using “Camera.main.ScreenToWorldPoint(Input.mousePosition)” to get the position of the cursor. Then, the crosshair is limited to within the circle where the game takes place by checking the distance from the center of the circle to the crosshair’s position, and if it’s greater than the radius of the circle, moving the position back to the edge of the circle. This same system is also used for limiting the position of other objects such as the player and any projectiles fired.
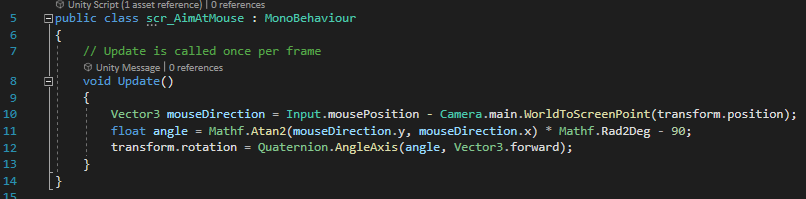
A similar line of code to the crosshair positioning is used to ensure that the player character always faces towards the cursor. The angle on line 11 is reduced by 90 degrees as otherwise the character points at an angle to the cursor due to the direction the sprite faces.
Main Menu/Game Over Screen
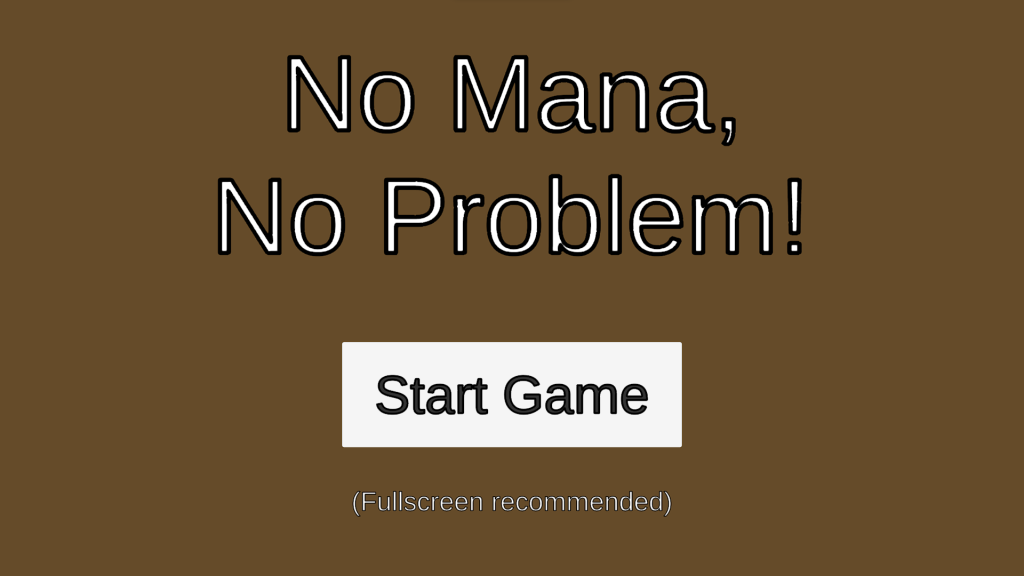
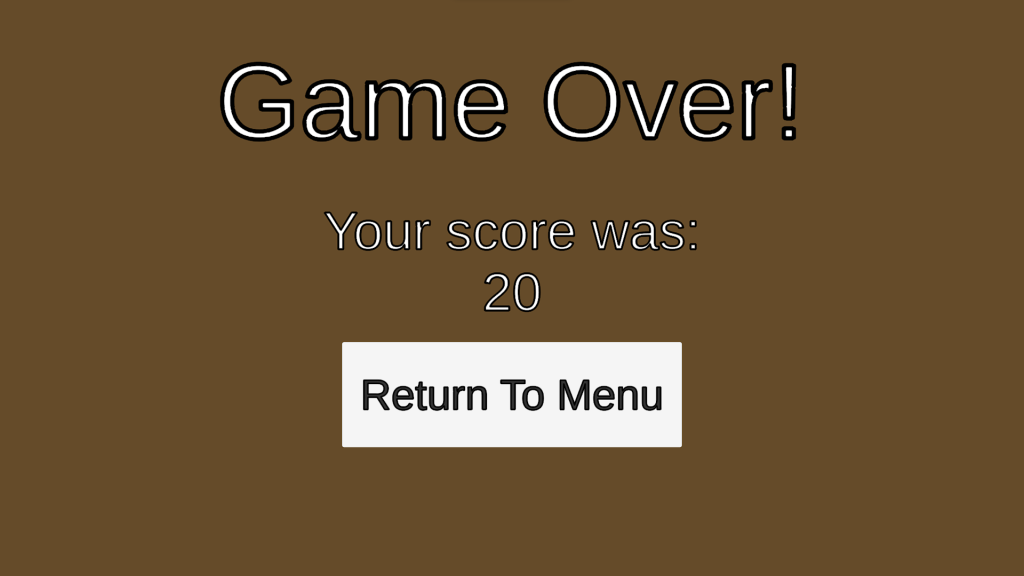
Both the main menu and game over screen are very simple. They both contain a button that, when clicked, loads the next scene (the main menu loads the game, and the end screen loads the main menu). The game over screen uses the same system as the Space Invaders game to retrieve the Score variable and display it on a text mesh.
Player Behaviour
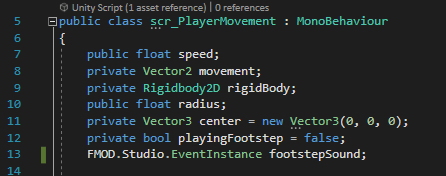
The player’s movement works similarly to the movement in the Space Invaders prototype, but now in two directions instead of one.
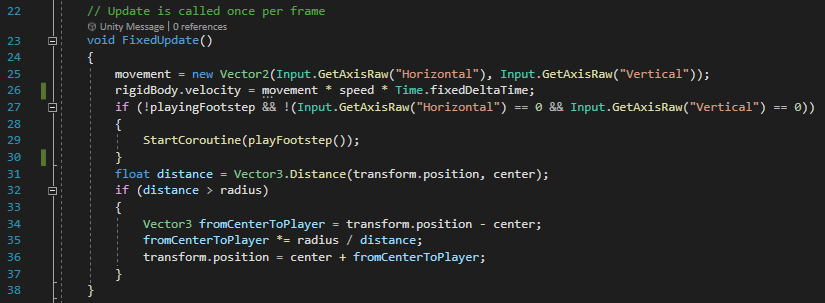
The movement inputs are stored in a Vector2, which is then used to set the velocity of the Rigidbody2D component of the object, being multiplied by the speed variable and Time.fixedDeltaTime to account for differing frame rates. If the player is moving, a coroutine will start in order to play footstep sound effects, with a boolean variable “playingFootsteps” to delay the next sound by a short time. Then, the same system used to bound the movement of the cursor crosshair is used to ensure the player stays within the bounds of the circle.
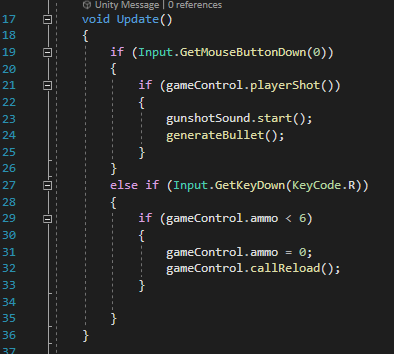
The player’s shooting works by checking each frame if the left mouse button has been clicked. If it has, the playerShot function from a function in the scr_GameControl script (assigned to the gameControl variable at the start of this script) is called, and if it returns true, the generateBullet coroutine is called in order to fire. If the mouse button is not clicked, the function will check if the R key has been pressed. If it has, if the player has less than 6 ammo remaining in their gun, the player’s ammo will be set to 0, and the callReload function from the game control script will be called to reload the gun.

Player Bullets

When the player fires a bullet, the bullet immediately finds the position of the player’s cursor at the time it was created. It then calculates the direction it needs to move to go towards the cursor, and sets its velocity in that direction. This veloctity only needs to be set once, as there is nothing slowing the bullet, and if it collides with an enemy, it will be destroyed anyway, so its movement won’t be slowed by anything.
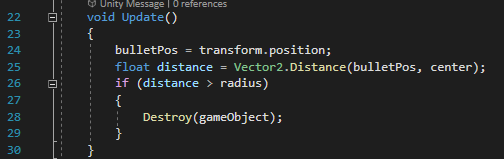
Every frame, the bullet checks whether or not it has reached the edge of the circular area, destroying itself if it has.
Game Controller
playerShot()
The playerShot function is used to determine whether or not the player is able to shoot when they click the mouse button, before firing a bullet. When called, it checks the ammo integer. If it is greater than 0, the integer is lowered by 1 and the ammo display on the UI is updated. It then checks if the ammo count now equals 0. If it does, the callReload function is called to reload the gun. Either way, the function then returns a value of true, allowing the function that called it to continue and create a bullet object. If the ammo value is not greater than 0, the function returns false, meaning that a bullet will not be created.
Reloading
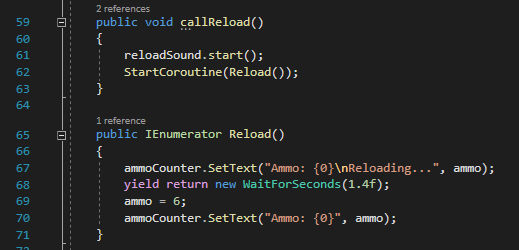
The callReload function is used only to play a sound effect for reloading and start the Reload coroutine. The coroutine updates the ammo counter to show that the player is reloading, waits for 1.4 seconds, then sets the ammo integer to 6 and updates the ammo display again.
Health
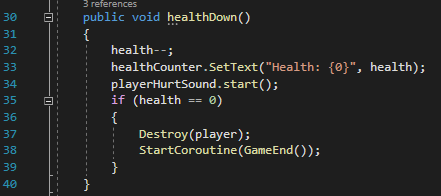
When the player collides with an enemy or projectile, the healthDown function is called. This lowers the health integer by one, updates the health display, and checks whether the health integer now equals 0. If it does, the player object is destroyed, and the GameEnd coroutine is started.
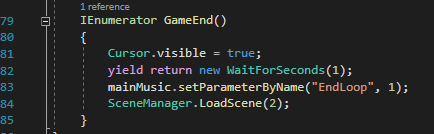
The GameEnd coroutine restores the cursor to the screen, waits for 1 second, ends the music loop, and loads the scene of the end screen.
Score
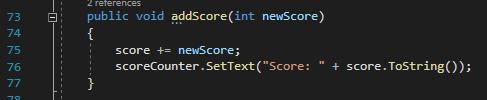
The addScore function, when called upon the player defeating an enemy, simply increases the score integer by the value specified when the function is called, and updates the score display to show the new value.
Enemy Spawning
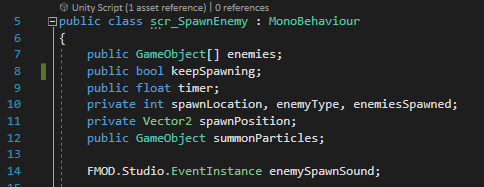


Enemy spawning is handled by a large coroutine, which uses a while loop to continually spawn enemies as long as the keepSpawning boolean is true. The coroutine waits 1 second before beginning the while loop, to add a pause to the start of the game to let the player prepare slightly.
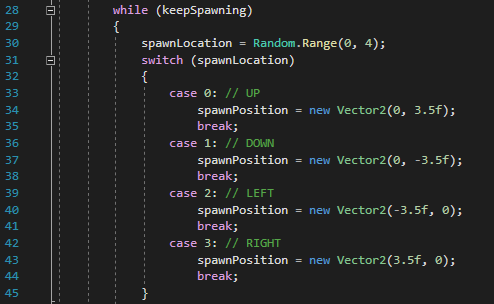
First, the coroutine randomly selects which of the 4 available spawn points the enemy will be spawned at. It does this by generating a random number from 0 to 3, and then using a switch function to set the spawnPosition vector to the coordinates of the respective spawnpoint. For example, if the Random.Range(0,4) command generates the number 2, the switch function will run the lines nested below “case 2:” (line 39). The break command then exists the switch, continuing to the next part of the coroutine.

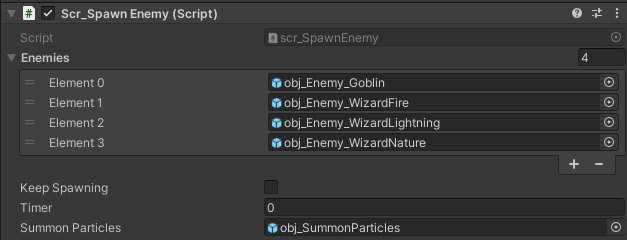
The coroutine then proceeds to generate a particle object on the spawn point, as well as the enemy. The enemy is selected from a list of game objects attached to the script, which contains all 4 enemy types. The “enemies[enemyType]” phrase selects the object from the enemies list corresponding to the value of the integer enemyType (if enemyType = 0, it will choose the first. If it = 1, it will choose the second, etc.). The colour of the generated particle object will then be set to the colour of the sprite of the enemy, in order to make the particles appear in the same colour as the enemy generated, without needing to create a prefab for each possible colour of particle and load the correct one with the specific enemy. There is then a pause for an amount of time specified by the timer variable, after which the “enemiesSpawned” integer increases by one.
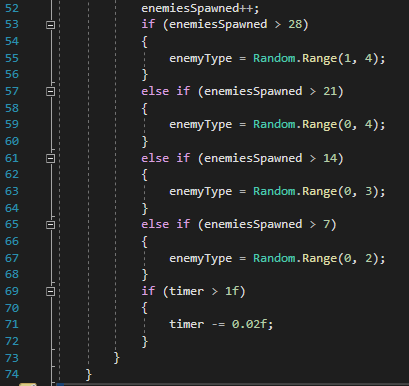
Finally, the coroutine randomly selects the next type of enemy to spawn based off of how many enemies have already spawned. If there have been 7 or less enemies spawned, the value of enemyType will not changed. If the value is higher than 7, it will be randomly generated depending on the value. For example, if between 14 and 21 enemies have been defeated, a random number from 0, 1, and 2 will be generated, meaning either the first, second, or third enemy type could potentially be spawned. Then, if the timer float variable is greater than 1, it is lowered by 0.02, meaning that enemies will gradually start to spawn faster and faster as the game goes on, to a maximum of one every second.
Enemy Projectiles
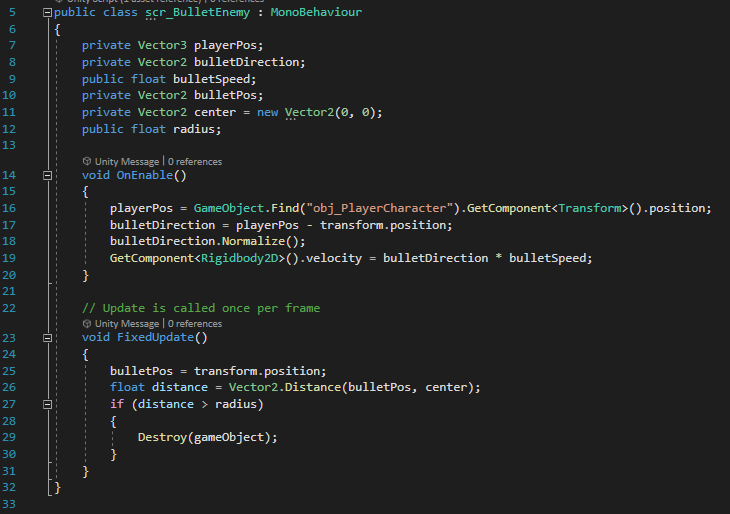
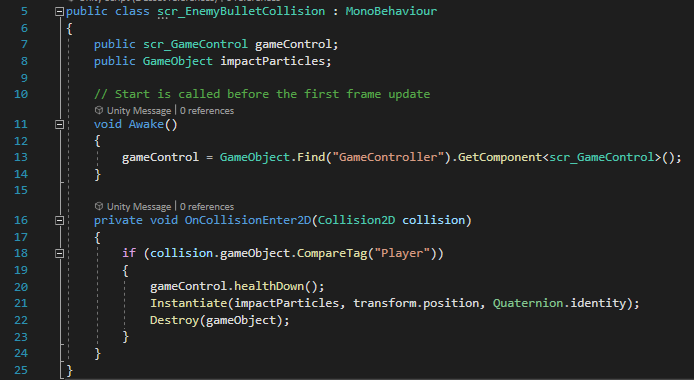
Both the fire and nature wizards have projectiles that they fire at the player. The fire wizard’s projectile works the same way as the player’s bullets – when fired, it finds the player’s position at the moment it is created, and travels in a straight line directly in that direction until it either collides with the player or passes the edge of the circular area.
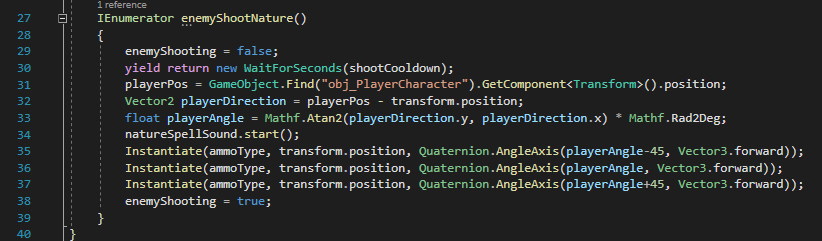
The shooting for the nature wizard is slightly more complicated – instead of just one projectile firing in a straight line towards the player, there are two extra projectiles, each firing at a 45 degree angle to the player, as well as the main one going straight towards them. This involves calculating the angle to the player from the wizard when it fires, and then adding/subtracting 45 from it to get the angle the other projectiles need to fire at.

The scripts for the bullets themselves then need to make them travel straight according to their rotation, instead of simply moving in a straight line towards the player’s position at the moment they are instantiated.