After looking at the different ideas and options over the last few weeks, I decided that I wanted to do my project using Augmented Reality. I found it the most interesting of the options, and had a few ideas that I felt would be suitable for my project.
Augmented Reality Research
To begin researching, I wanted to look at various different kinds of AR technology, and how they are used, as I felt this could inspire my own project.
The main kind of AR technology I looked into was marker based AR, as the website for using AR that we looked into during the module used this form of AR. For marker based AR, the augmented object is activated when the user scans a designated “marker”, such as an image or pattern that is distinct and can be recognised by the camera. This is quite a stable and reliable form of AR, which gives it a higher level of quality than some other kinds, but it requires the camera to look at the specific marker, which can be quite restrictive in various situations.
Markerless AR, on the other hand, does not require a marker, and simply places the virtual object into the real world. Often, when used, the software will ask the user to find a flat surface to display the model on, to make it slightly more grounded and fit better into the space. A good example of markerless AR is Pokemon GO, which displays a virtual pokemon overlayed on the camera to make it appear like it is in the world.
Concept
The idea I want to work on for my project is a proof of concept of an augmented reality picture book for children. By scanning a QR code at the start of the book, the camera can then be used to scan various images in the book, and create a 3D virtual object over them.
I felt like this would be a very interesting application of AR technology. As the picture book is for children, the goal is to try to create something quite colourful and appealing, in order to engage and entertain them. This is something that is easily achievable with a regular picture book, but I believe that by adding AR, it will enhance these ideas, while also making it even more engaging by adding interactivity. The marker based AR system I plan to use will be effective for this, as it provides a stable view of the model, and the limitations will not cause problems as the markers will be built in to the picture book.
Another option would be to try to create something using VR, which would be even more interactive and perhaps make it more exciting to use. However, there are a few reasons why I felt that AR would work better. Firstly, as the product is for younger children, it could be used in an educational setting, where multiple children could view it together. To do this in VR would involve moving a VR headset around to everyone involved, which would be quite time consuming and inconvenient. whereas AR simply needs a single device such as a phone or an iPad, which is much easier to pass between multiple people. Additionally, VR headsets could lead to motion sickness and other issues, which are avoided by AR.
Ethical Considerations
In a product aimed at younger children, there are often ethical considerations to consider. One thing that I felt was important to think about with this project was the effect of exposure to screens on children. Designing a screen-based product or idea for younger audience could lead to an increased dependency and reliance on screens, which may have negative effects on their development and lead to problems later in life.
However, I believe this project will not cause these issues, and that it is overall positive. Firstly, my idea is educational, which will provide benefits to the younger audience. It is also non-addictive, and will only be used for short amounts of time, likely in a group setting. This reduces the negative impacts of exposure to screens, while retaining the positive benefits of increased engagement and interest. It could also help to raise tech literacy among the young children, which is an important skill to develop as technology has become a very large part of modern life, so having a basic knowledge of and ability to use it early could be very helpful.
Ideas and Development
The first idea I had was for a story based on “The Very Hungry Caterpillar.” This would involve having a model for each different food, which would show when that food was scanned with the camera. However, while this did seem interesting, I felt that it would be a little too complicated to create my own original picture book story, especially as a proof of concept. I decided that it would be better for the project if I used a simpler picture book, and focused much more on showing off the AR elements and ideas instead of the book itself.
Instead, I decided to do an ABCs style book, where each page has a letter of the alphabet, along with an object that starts with that respective letter – for example, “A is for Apple”. This is quite a common theme for educating younger children on the alphabet, so I knew the concept for the picture book was a functional and reasonable idea to use. This should be a good mixture of an engaging but simple book for younger children, while also showing off the potential of the AR technology and how it can be integrated quite effectively.
The overall goal is to create a product that can help children with literacy through an engaging and fun activity. This should help to make the children more interested in learning, and hopefully improve their retention of the things they read.
As I am trying to make a proof of concept for the idea, I decided that creating a full 26-page book with a page for every letter would be excessive, and likely reduce the quality of each model and page due to the quantity I would need to create. Instead, I felt that by creating just the first 5 pages (A-E), I could get a nice mixture of slightly higher quality models, while still showing enough variety and quantity of pages to make the proof of concept viable and letting me explore its potential.
To begin the planning stage of my project, I first spent some time deciding on what the objects would be for each of the five pages. These needed to be objects starting with the letters A-E respectively, and be both simple enough for younger children to know and understand, while also being interesting and engaging. This could be through colour, unique shape, or being recognisable as something the children might already be familiar with from other similar alphabet learning methods. Another thing I wanted to keep in mind was my own abilities with 3D modelling and drawings. If the objects were too complex, I may struggle to create a compelling 3D model or drawing, and it could lessen the effect of the proof of concept. After some thought, I decided on the following objects for my models:
- A is for Apple
- B is for Book
- C is for Cup
- D is for Dice
- E is for Egg
These felt like a good balance between simplicity and interest – they have a mixture of colour, texture, and shape, so the different pages don’t feel too similar, while not being overly complex or confusing for the target audience.
Project Plan
To help with developing the project, I put together a basic project plan, to set out some milestones that I would need to meet. I also considered what I wanted to achieve with each step in terms of the user experience, to create an ideal product.
- Planning + Concept Art: Designing how the pages will look, and getting a basic idea of what each model would look like. This could involve finding reference images, creating concept art of the pages, and possibly blocking out the basic shapes of the models. I will make sure that my concept art pays attention to the user’s experiences.
- Create Pages: This stage involves creating all 5 of the pages, which will be used as the markers for the AR. These should be colourful and visually engaging, to appeal to the young audience of the project.
- Create models: This will likely be the most time consuming section of the project, as the models themselves are the main focus of the project, so I want to take extra time to make sure they are as well crafted as possible.
- Texturing models: UV unwrapping and texturing both fall under this category. I expect this to be slightly quicker than drawing the pages, as the textures should not be too complicated for any of the planned objects. As with the pages, I want to make these quite bright and colourful, to create visual interest for the audience.
- Creating the AR experience: The final step is to import the models and markers into a Unity project, and upload the result to the ZapWorks website. The process for this is relatively simple, and I can follow the steps that we took during the module to learn about the site and how it works.
My goal is to complete each of these steps within a week, which will give me plenty of time to adapt to any issues or problems that arise during the project.
Basic Concept Art
Before beginning with the proper project, I decided to make some very basic plans and concept art to ensure that the idea would fit the ideas I had in mind, and get a simple idea of what I would need to create during each stage of the project.
For each object, I will need to create a page of the book, as well as a 3D model of the object. The page will have the text of the letter and object, as well as a picture of the object. When the picture is scanned by the AR camera, it will display the 3D model of the object. Ideally, I will be able to have one QR code at the start of the book, that will be able to display all of the different objects.
I decided to create a mockup of a page, to figure out the layout and design, as well as get a better idea of how the project would look. I wanted to make sure that the focus of each page was on the letter and the image, by making those the largest things on the page. I also wanted to leave some space for a QR code, as although I want to have a single QR code for the whole project, it may instead be necessary to have one on each page, so having space to put one may be very useful later on in development.
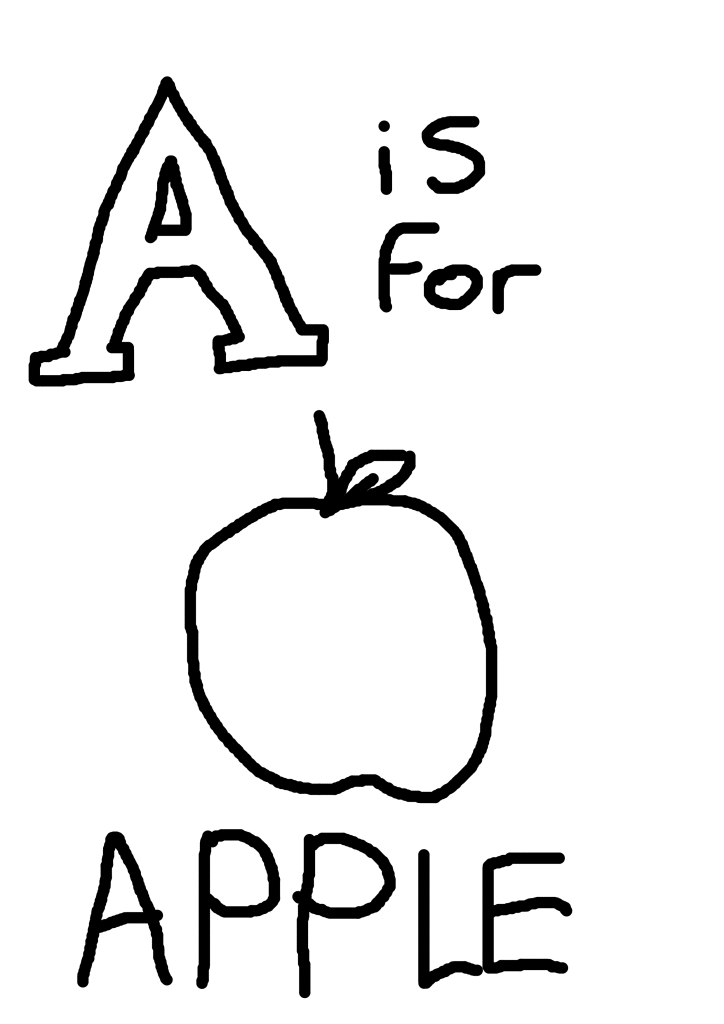
This design seemed like a good place to start. The large and exaggerated letter is the clear focus in the top left that draws attention immediately, followed by the picture in the middle. The text at the bottom is also large and easy to read.