Categories
Game Design and Prototyping

Prototype 4 – Platformer

Link

https://awetton.itch.io/shieldbot

Overview

A screenshot from in the game.

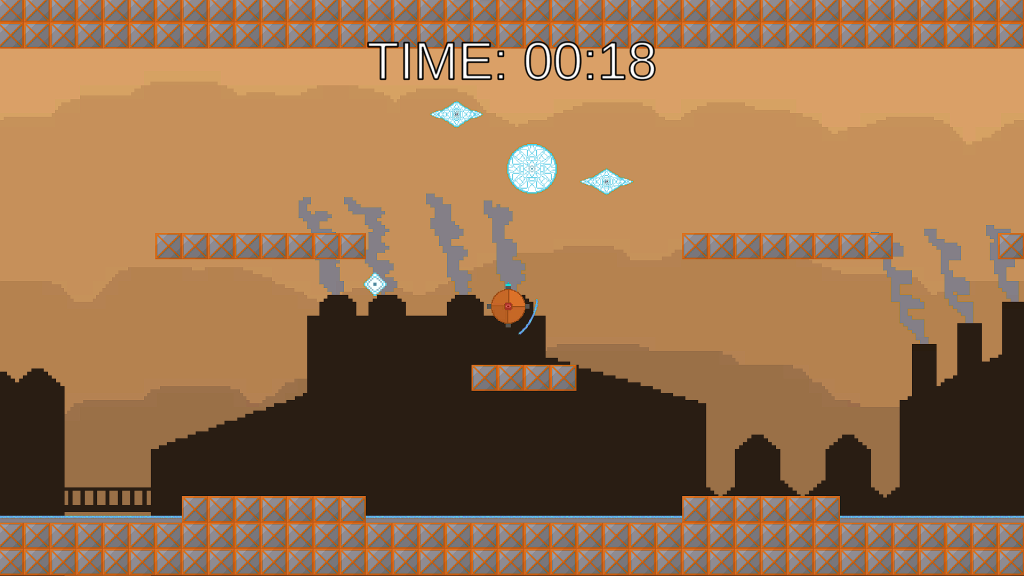
Instead of a regular platformer where the objective is to travel across a stage to reach a specified end goal, I decided to make my platformer game more of an arena survival style game. By rotating a shield around the player character using your mouse cursor, the objective is to survive an endless onslaught of infinitely spawning enemies for as long as possible before you die.

Shield

A view of the prefab, showing the features of the shield collision checker.

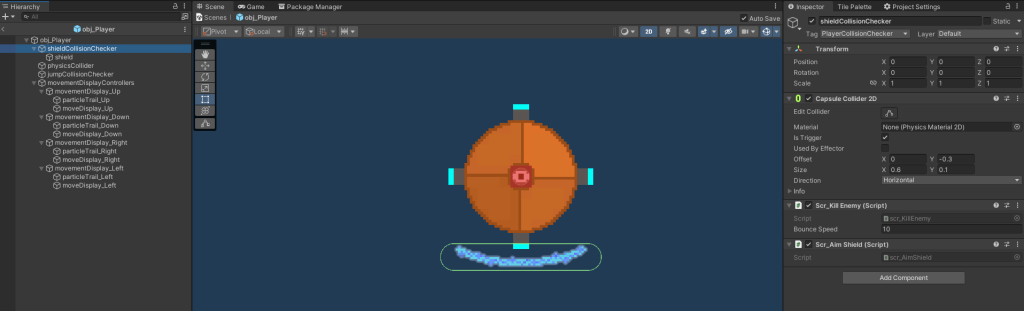
The main feature of this game is the player’s shield. The actual object of the collision checker is actually located at the center of the player’s sprite, but the capsule collider is offset to the outside. This means that by simply rotating the object, the collider will orbit the player without needing to worry about how to change the coordinates to make it move in a circle.

The script that controls the movement of the shield.

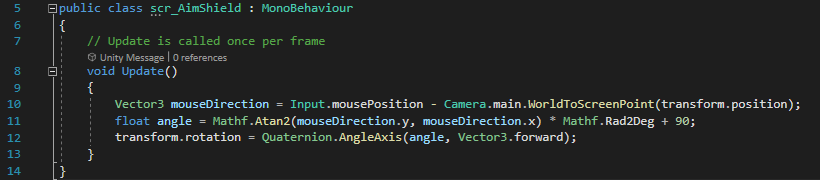
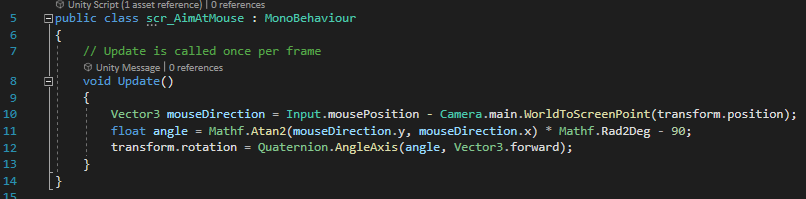
This rotation is controlled by this script, which angles the object in the direction of the cursor. This allows quick and easy control over where the shield is pointing, suiting the fast paced gameplay.

A function from the scr_KillEnemy script that checks collisions between the shield and enemies, destroying the enemy.

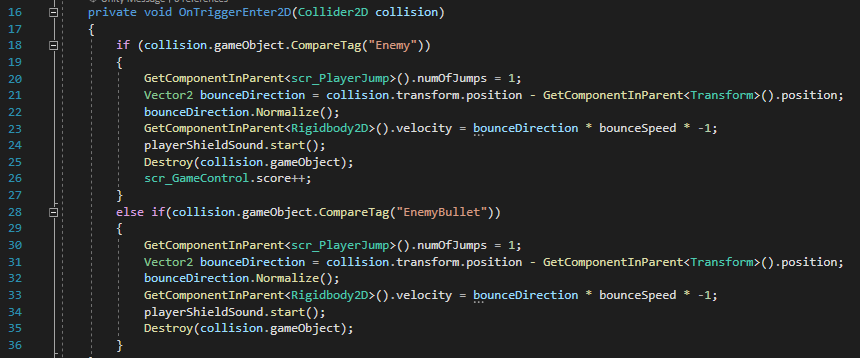
When the player hits an enemy with their shield, it is destroyed, and the player is bounced vertically away from the enemy. This can be helpful if the player is launched upwards, but can also launch the player downwards, potentially into spikes or other enemies. Originally, I wanted to also bounce the player horizontally, but I could not find any way to make it work, as the velocity was instantly reset by any horizontal inputs.

Player Animations

The objects that make up the player animations.

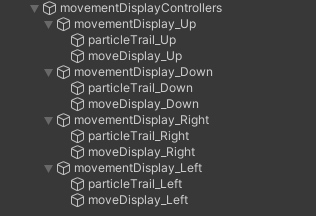
Using a combination of simple rectangle objects and particle trails, I created a simple animation system for the player, where the object and trail are enabled on the side opposite to the movement of the player in order to appear like a thruster is activating.

The start of the script that controls the movement display objects.

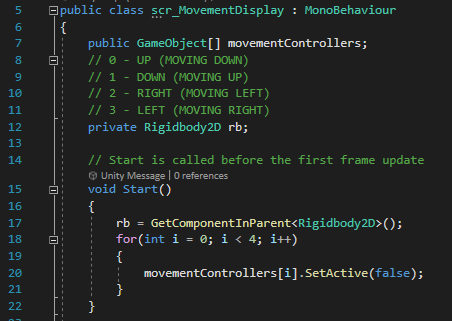
This is done by first assigning each “movementDisplay_[direction]” object into a list of game objects within the script, and setting each one’s “SetActive” value to false. This disables the objects, making them invisible and non-functional.

The section of the script that enables the correct movement display objects.

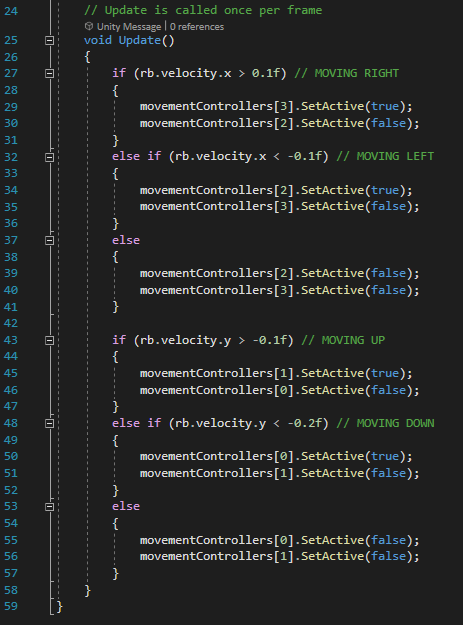
Then, each frame, the script checks the velocity of the player to see what direction they are moving in, and enables the object on the opposite side to the movement. For example, if the player is moving to the right (making their x velocity a positive number) the script will enable the object and trail on the left of the sprite, appearing as a thruster pushing the player in the direction of their movement. The thruster for moving upwards is set to be active even if the player isn’t moving, to appear to be making the player hover in the air even with no movement.

Camera

The script that makes the camera follow the player.

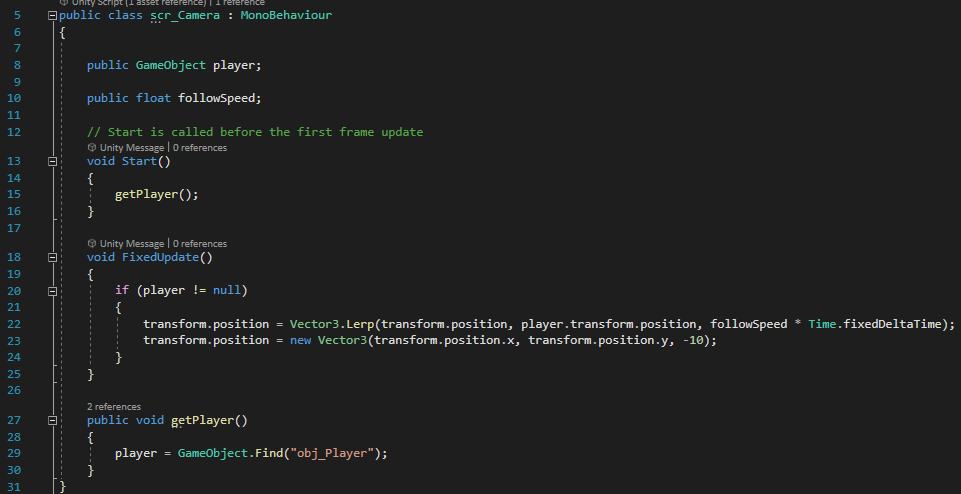
The camera in this game moves with the player, unlike the other prototypes where it stays in one static position. It does not perfectly follow the player, instead following at a slightly slower speed, which shows the player’s movement more clearly and feels more natural for the player.

Parallax Background

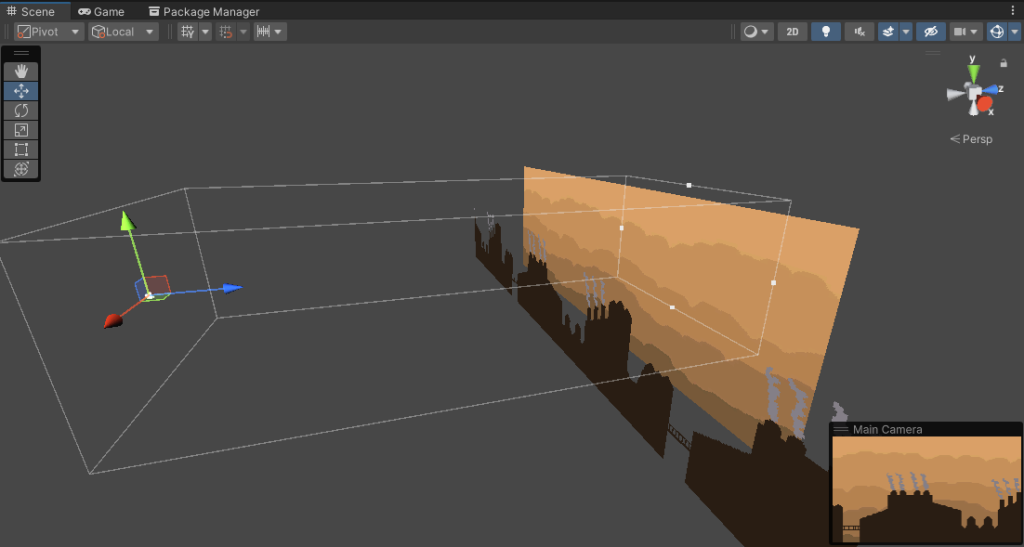
To make the game appear more visually interesting, I created a parallax background, with different layers of the background moving at different speeds with the player to give the appearance of distance between them. I did this by following an online tutorial (AdamCYounis (2021) The Perfect Pixel Art Parallax Tutorial [and Unity script] [Video]. Available online: https://youtu.be/tMXgLBwtsvI), which allowed me to learn how to write the script.

A gif showing the parallax background (easier to see while playing the game).
The variables created at the start of the script.

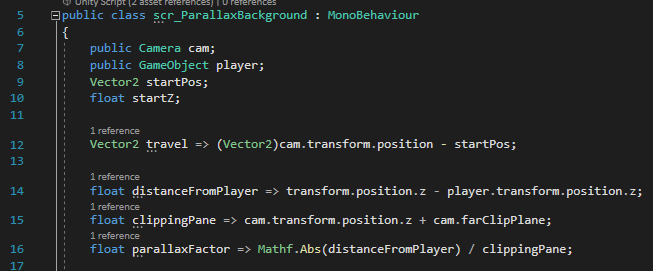
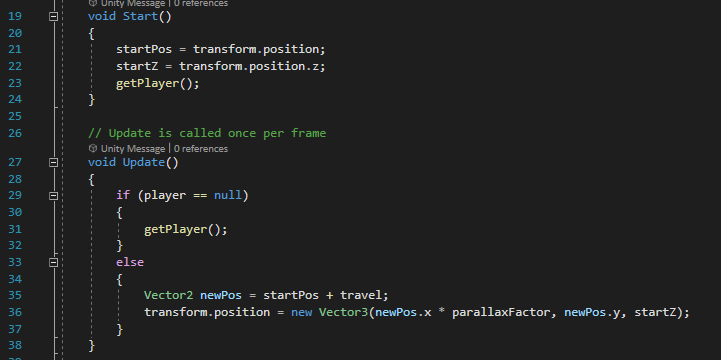
The bottom 3 variables are specially assigned; the => symbol means that every time the variable is called, it will recalculate its value, ensuring it is always accurate. The parallax background works by calculating the distance between the player and the backgrounds, which are positioned further away from the camera in the z-axis. While this isn’t visible from the 2D camera view, the distance can be used to calculate the parallax factor, which is a value that the movement of the background images can be multiplied by to make them move slower than the player. The images are also tiled to ensure that the player does not go past the edges of them.
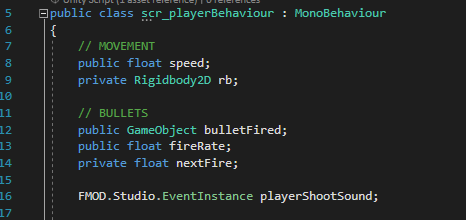
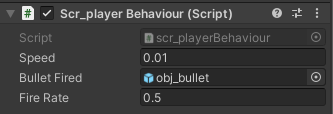
A 3D view of the layout of the scene, showing the different distance of the background images from the camera, which cannot be seen in the 2D view.
The functions that move the background images with the player to create the parallax effect. The position adjustment is multiplied by the parallax factor to create the offset.

Player Movement

The variables created at the start of the movement script.

The player’s movement is divided into two scripts – one for the horizontal movement, and a separate script for the jumping.

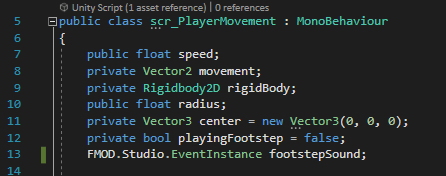
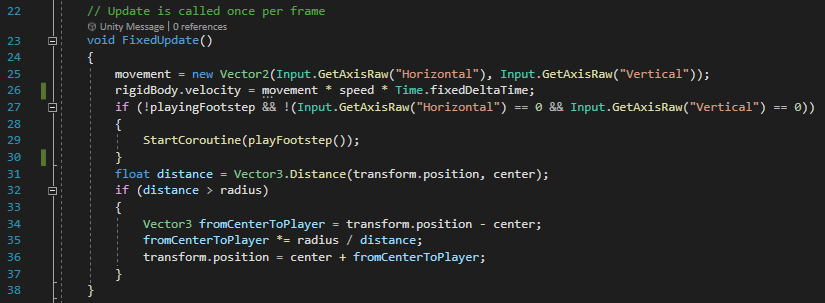
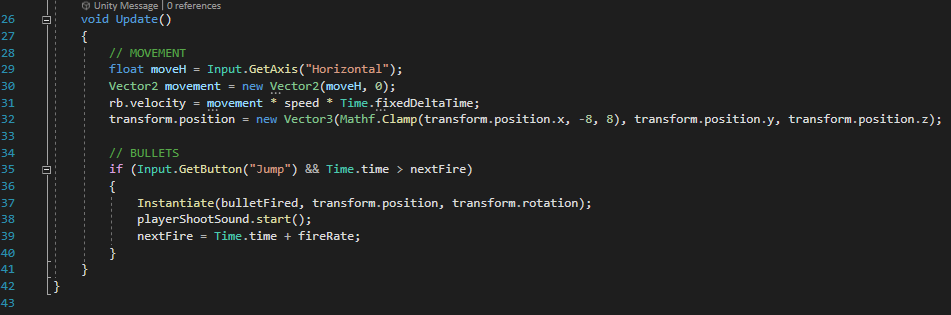
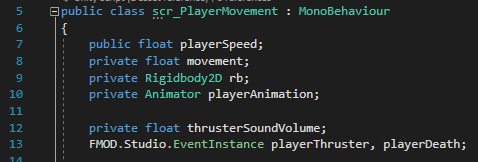
The horizontal movement is once again similar to that used in the Space Invaders and Top Down Shooter games – simply setting the “movement” variable to the horizontal input built in to Unity, and using it to create a vector that is assigned to the Rigidbody2D component’s velocity after being multiplied by the playerSpeed variable and Time.fixedDeltaTime to account for frame rate.

The variables created at the start of the jumping script.

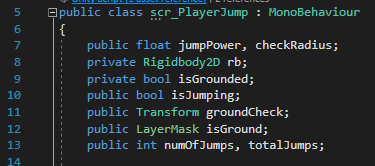
The vertical movement is slightly more complex. In order to let the player double jump, two integer variables – numOfJumps and totalJumps – are required. numOfJumps tracks how many times the player has jumped since touching the ground, and totalJumps represents the maximum number of times the player can jump before needing to touch the ground again to be able to jump any more.

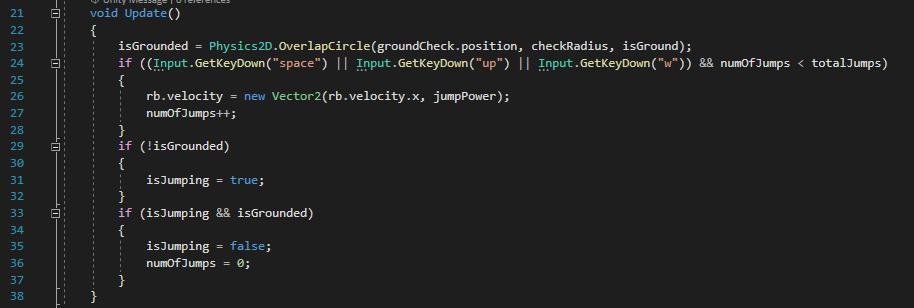
When the player presses the jump key (Spacebar, W, or the Up Arrow), if the numOfJumps integer is lower than the totalJumps integer, their vertical velocity is set to the value of the jumpPower variable, and numOfJumps is increased by one. When the player is touching the ground, which is calculated using a physics circle centered on a game object at the bottom of the character’s sprite, the isGrounded boolean is set to true, and when they aren’t, the isJumping boolean is set to true. If both isJumping and isGrounded are true at the same time, then that means the player has just landed from a jump. isJumping is then set to false, and the numOfJumps is set to 0, allowing the player to double jump again.

Part of the script that allows for the shield to kill enemies it collides with.

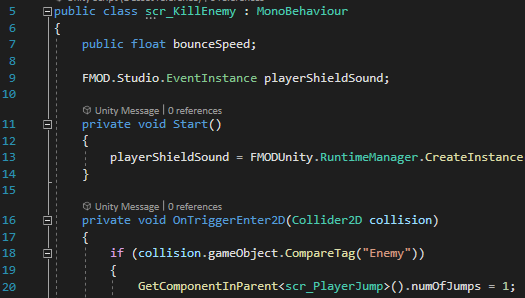
When the player kills an enemy by hitting it with their shield, their numOfJumps is set to 1. This means that if the player double jumps, then kills an enemy, they can jump again in mid air, potentially allowing them to change jumps in combination with the bounce that killing enemies gives.

Maps

An example of a map prefab. Each contains a grid layout for the ground and spike tiles, the player’s starting position, and all enemy spawn points.

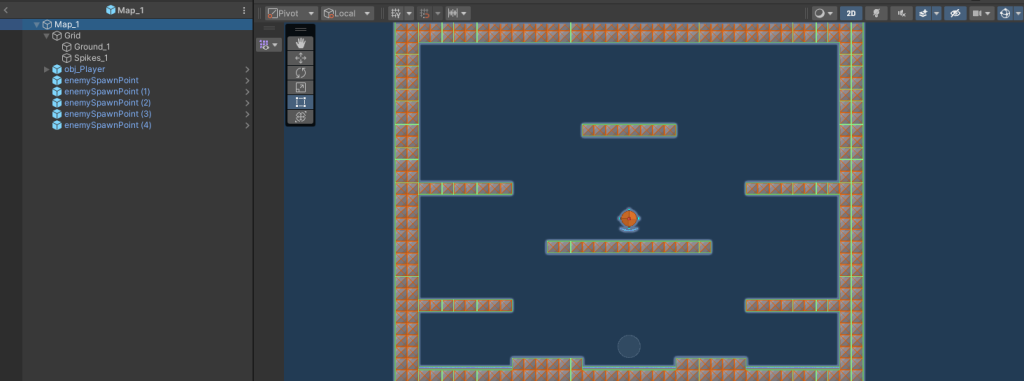
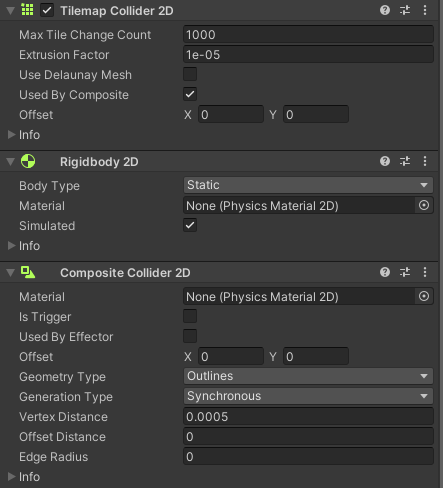
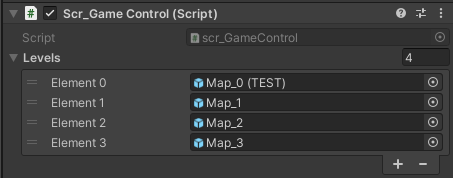
Instead of having just one map that would be repeated, I created 3 separate prefabs of maps, each with their own unique layout. Each was made using the Tile Palette tool, which allowed for quick and easy placement of walls, floors, and platforms, without having to manually create the colliders for each.

The TilemapCollider2D and CompositeCollider2D together allow for tiles to automatically create a collider when drawn, making for extremely easy map creation.
The script for the start button on the main menu.

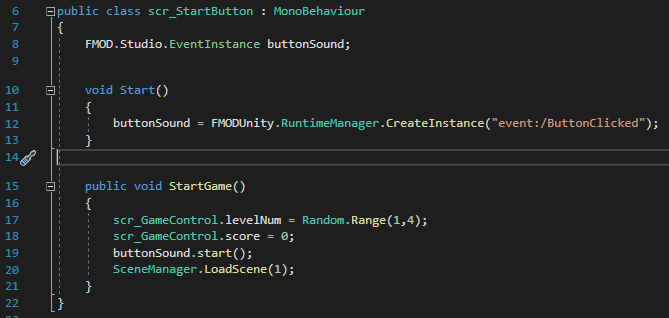
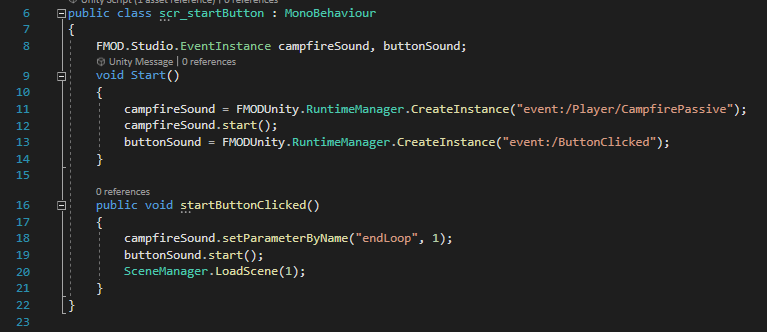
When the game is loaded from the main menu, the “levelNum” variable is assigned to a random value from 1 to 3. This is then used to select which map will be loaded from a list located on the game controller object on the scene of the main game.
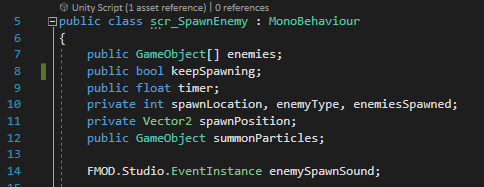
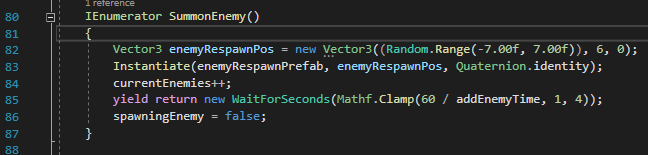
The script component that selects the level. Element 0 cannot be generated from the start button, and is a test map that I used when creating the game.

Spawning

Each of the three map preset has a selection of spawn point objects. These are used to calculate where to spawn enemies.

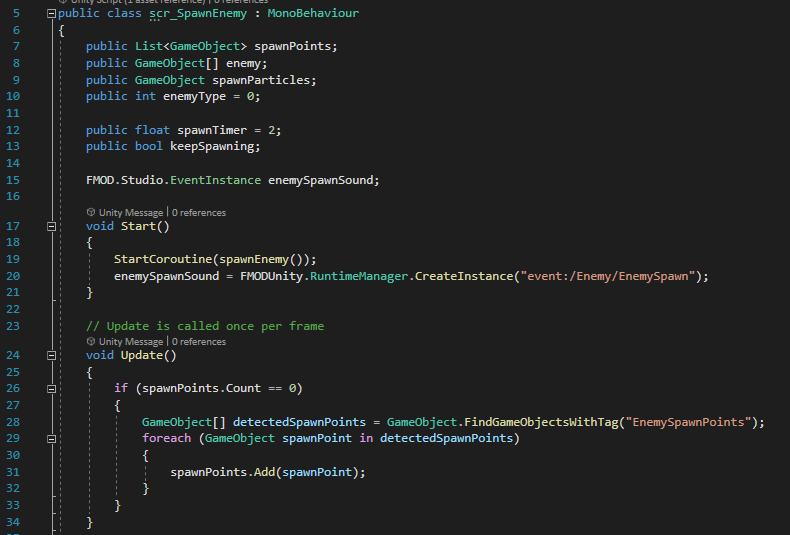
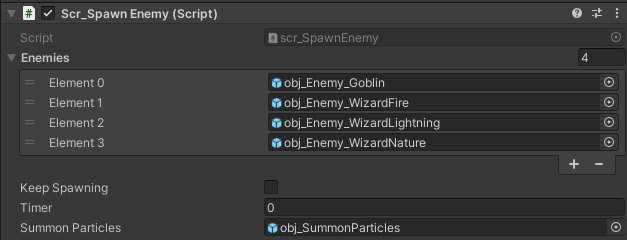
As soon as the map is loaded, the scr_SpawnEnemy script will detect all of the objects with the “EnemySpawnPoints” tag, and add them to a list of all spawn point objects.

The start of the coroutine that handles spawning enemies

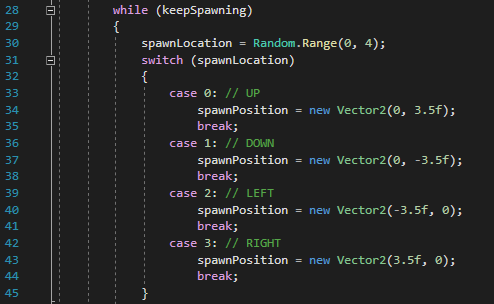
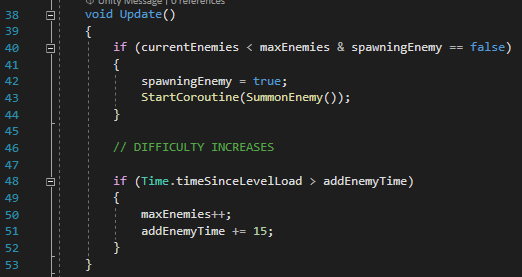
The spawnEnemy coroutine will wait for half of the spawnTimer duration, and then check each spawn point object for their canSpawn boolean. If the boolean is true, it will be added to a list of available spawn points for the next enemy spawn.

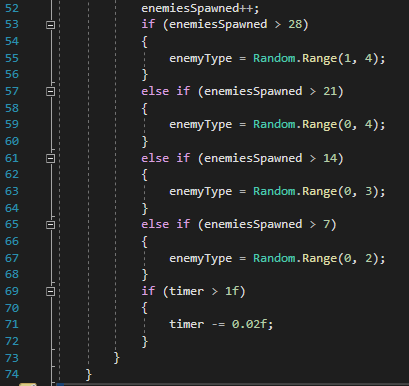
If there is at least 1 available spawn point, a random one from the list will be chosen to spawn the enemy. First, a particle object will be created there, to give the player a warning that an enemy is about to spawn in that position. Then, the other half of the spawnTimer duration will be waited, and the enemy will be spawned. The spawned enemy will be assigned as a GameObject variable to the spawn point it was spawned at.

A script on every spawn point location.

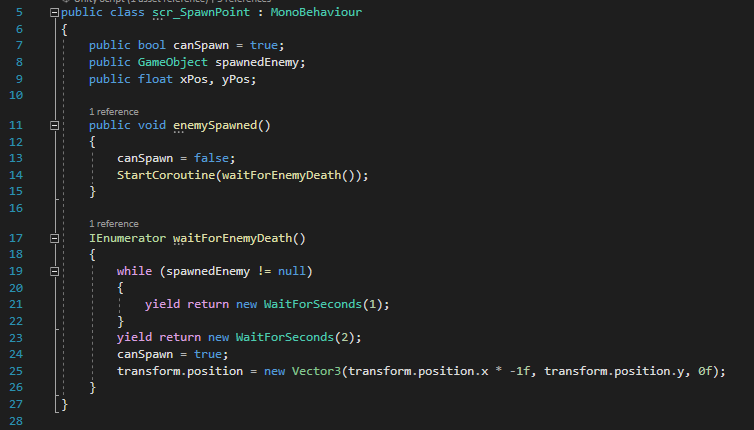
Each spawn point has this script placed on it. When an enemy is generated at a spawn point, it is assigned to the spawnedEnemy GameObject variable. While that enemy is alive, the spawn point’s canSpawn boolean is set to false, stopping it from spawning any other enemies. Once the enemy dies, it will wait 2 seconds before setting the canSpawn boolean back to true and flipping the spawn points x-coordinate. As all of the maps are symmetrical, this effectively doubles the number of viable locations an enemy can spawn, as they can spawn on either side of the map for each spawn point, as they swap sides every time they spawn an enemy.

Enemies

There are three types of enemy in the game.

The movement script for the first type of enemy.

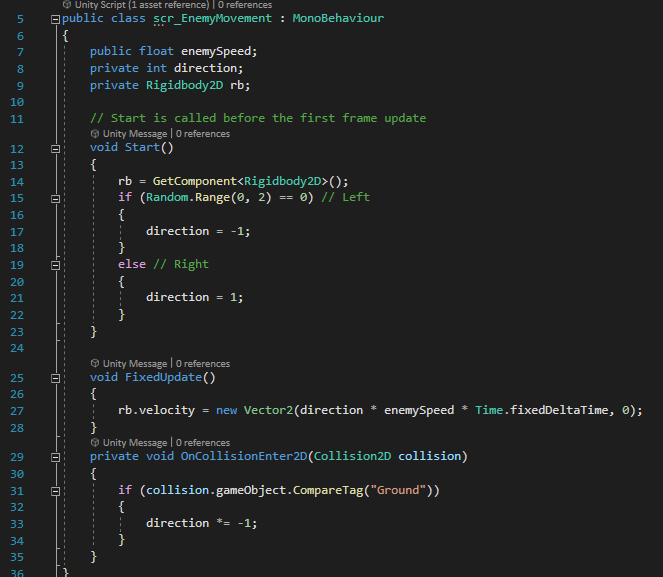
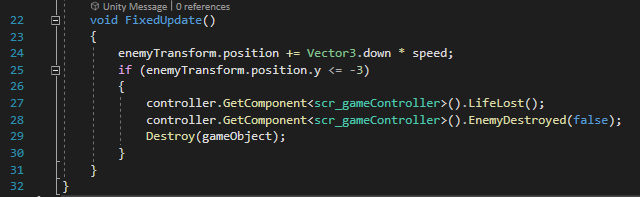
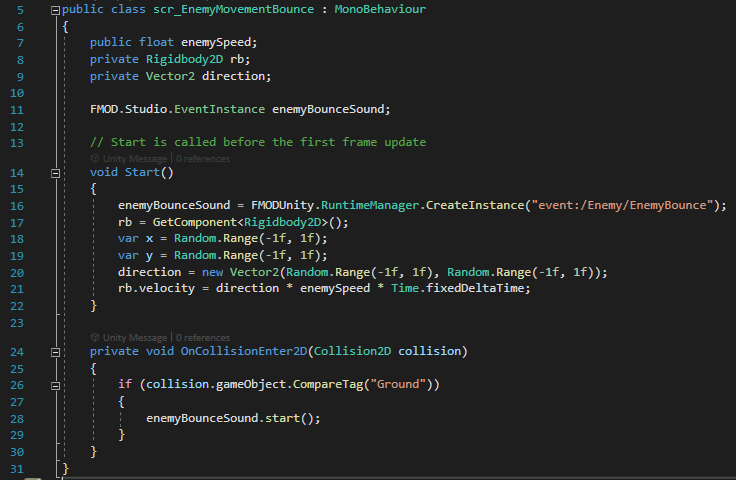
The first simply moves straight in one horizontal direction until it collides with a wall, and then flips to travel in the other way, crossing the screen back and forth until it is defeated. When it is created, it randomly picks a directoin between left and right, and it’s velocity is set in that direction. Upon colliding with a wall, the value of the direction variable is multiplied by -1, swapping it from positive to negative or vice versa, and reversing the direction of movement.

The script for the movement of the second enemy type, the bouncing enemy.

The second enemy type picks a random direction to move in when generated, and moves in a straight line in that direction. The object has a 2D Physics Material assigned to its Rigidbody2D component that has no friction and perfect bouncing, meaning when it collides with a wall, it will bounce off in the opposite direction without losing any momentum. This creates an unpredictable enemy that can catch the player off guard if they don’t pay enough attention to the enemy’s direction.

The script for the final enemy type, the shooter.

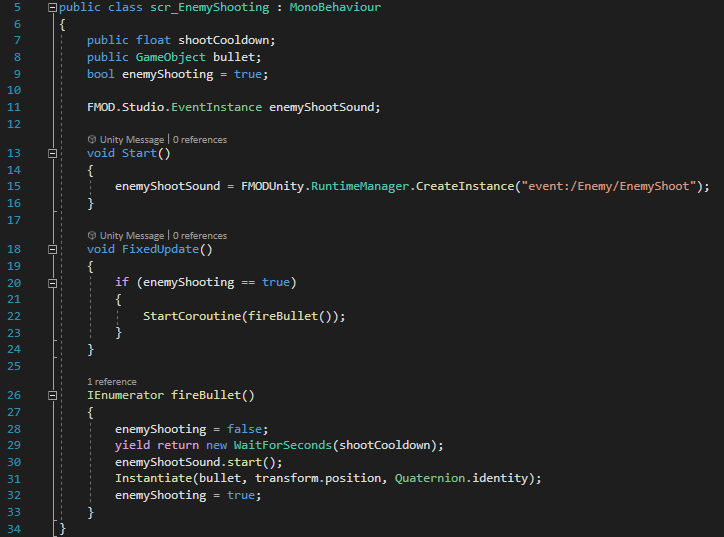
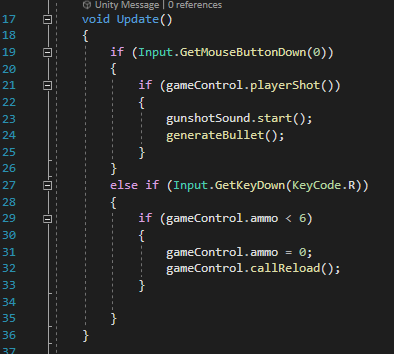
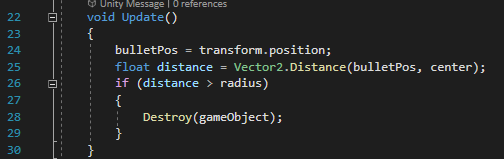
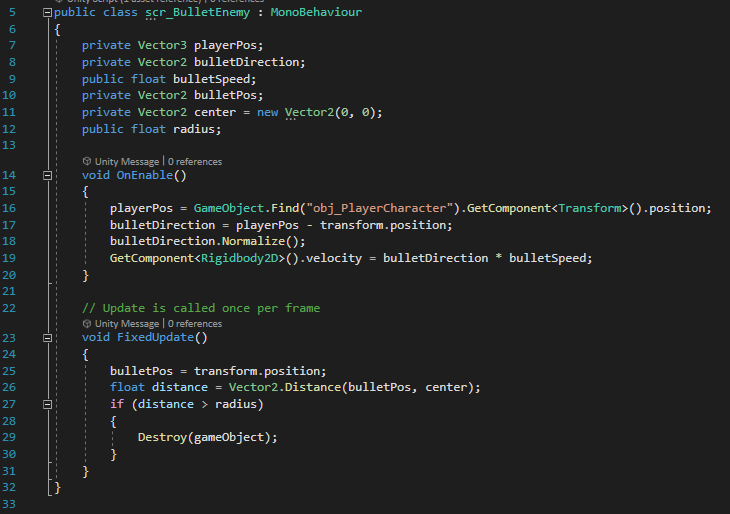
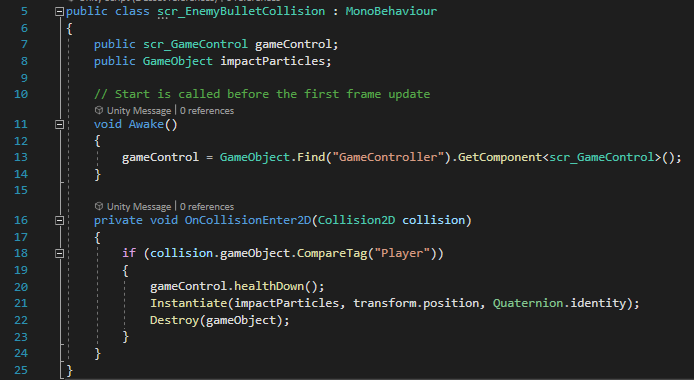
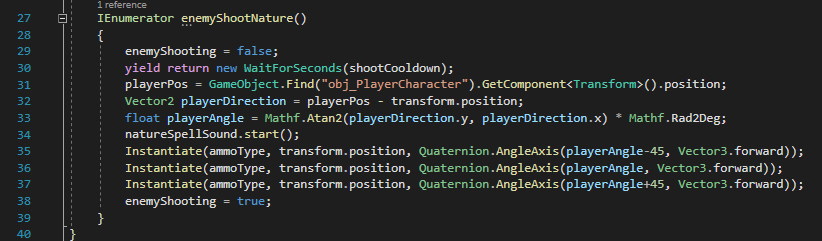
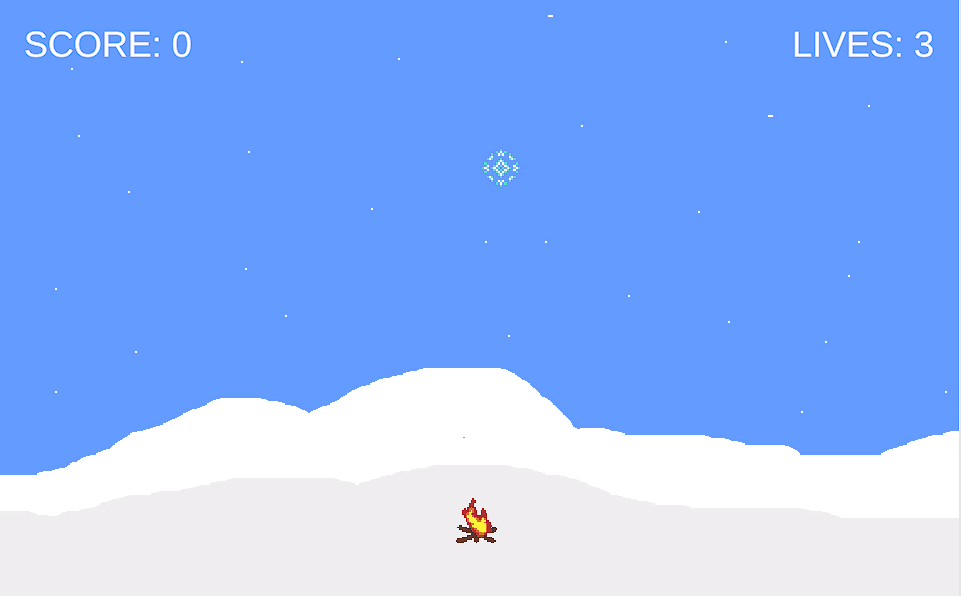
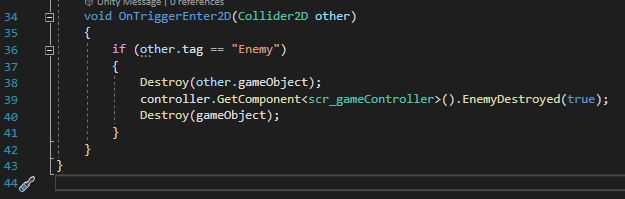
The final enemy type cannot move by itself. Instead, it fires projectiles in the direction of the player, wherever they are on the screen, using a similar script to the projectiles in the Top Down Shooter game – the enemy simply generates a bullet object at its position – the bullet itself, however, has a script that calculates the angle from it to the player’s position at the moment it is instantiated, and sets its velocity directly in that direction, destroying itself if it collides with any other objects along the way.
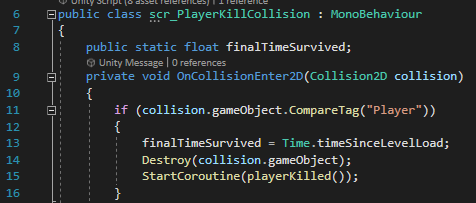
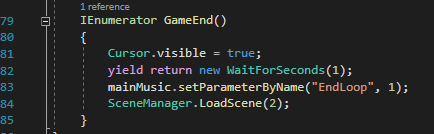
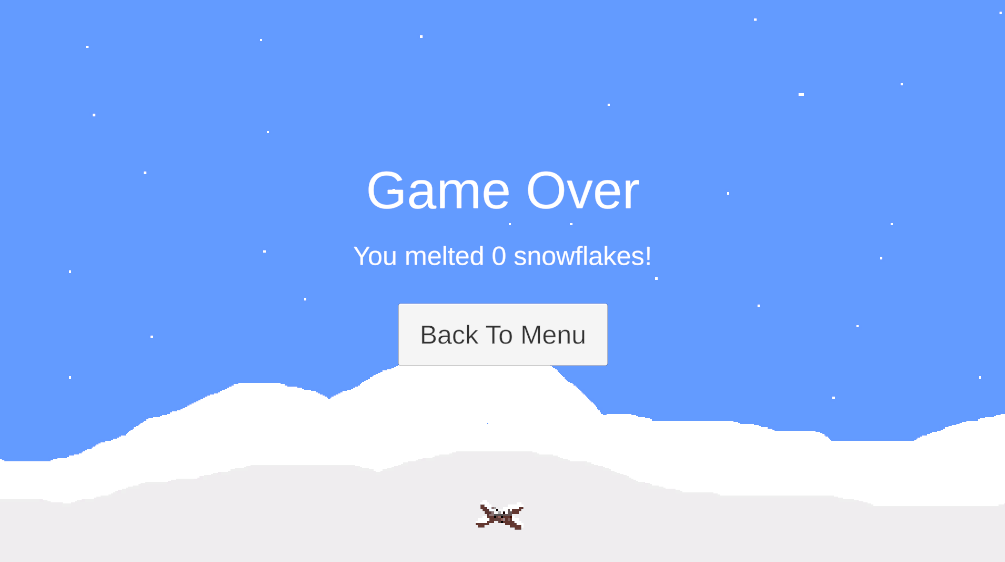
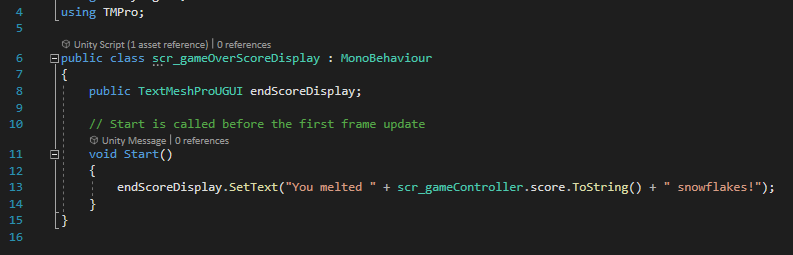
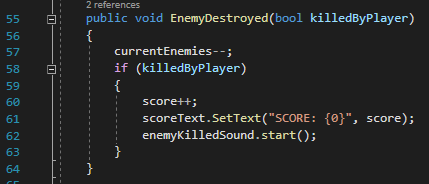
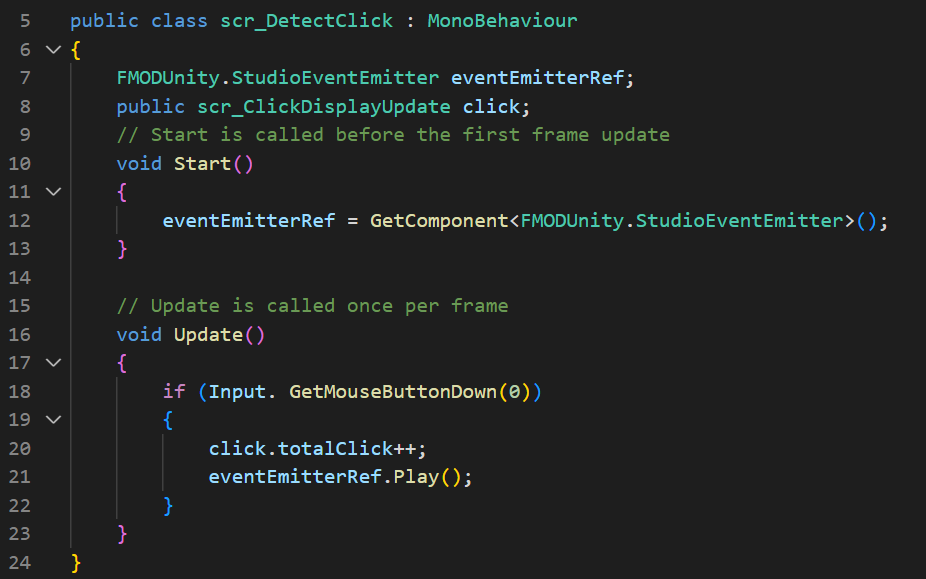
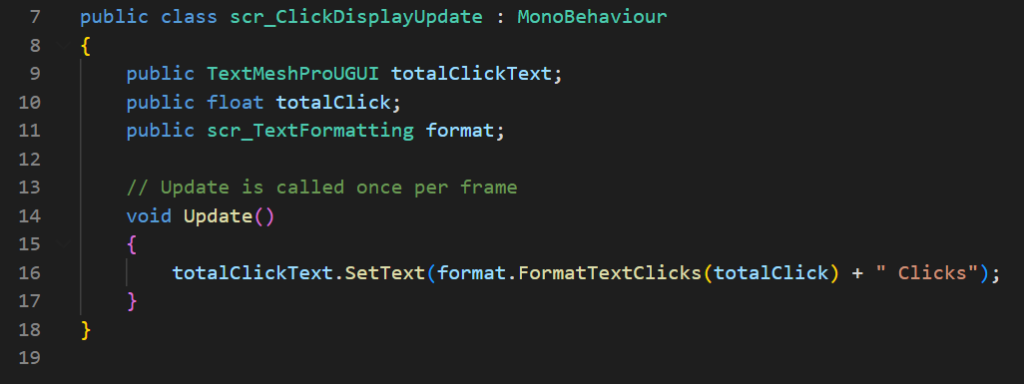
Timer

The script that tracks and displays the time the player has survived for.

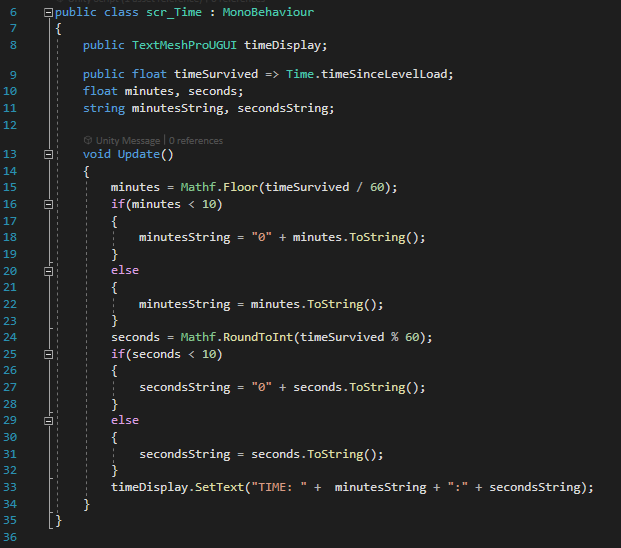
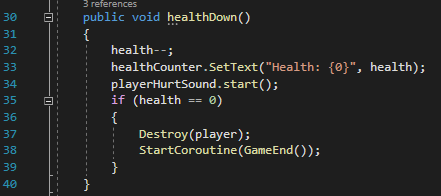
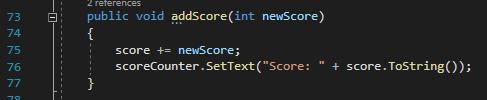
As well as a score of the number of enemies killed, I added a timer to the game to show how long you have survived. I did this using the Time.timeSinceLastLoad feature built in to Unity, assigning it to a float variable, and then formatting the text to display in a 00:00 format. When the player is killed, the time they survived is stored in a static float variable in the scr_PlayerKillCollision script, and is then loaded on the game over screen to display, along with the number of enemies defeated.

The scr_PlayerKillCollision script, which stores the final time survived in a static float variable to be retrieved on the game over screen.
Categories
Game Design and Prototyping

Prototype 3 – Top Down Shooter

Link

https://awetton.itch.io/no-mana-no-problem

Overview

In this top down shooter, enemies spawn from 4 spawning circles on the edges of a wizard’s tower, and the player has to dodge and shoot them without getting hit. As the game goes on, different types of enemies spawn, with different effects/abilities which make it harder to stay alive.

Cursor

The cursor is replaced by a crosshair to better indicate where the player is aiming. This is done by disabling the cursor when the game starts, and then moving the crosshair object to the position of the cursor, using “Camera.main.ScreenToWorldPoint(Input.mousePosition)” to get the position of the cursor. Then, the crosshair is limited to within the circle where the game takes place by checking the distance from the center of the circle to the crosshair’s position, and if it’s greater than the radius of the circle, moving the position back to the edge of the circle. This same system is also used for limiting the position of other objects such as the player and any projectiles fired.

A similar line of code to the crosshair positioning is used to ensure that the player character always faces towards the cursor. The angle on line 11 is reduced by 90 degrees as otherwise the character points at an angle to the cursor due to the direction the sprite faces.

Main Menu/Game Over Screen

Both the main menu and game over screen are very simple. They both contain a button that, when clicked, loads the next scene (the main menu loads the game, and the end screen loads the main menu). The game over screen uses the same system as the Space Invaders game to retrieve the Score variable and display it on a text mesh.

Player Behaviour

The variables established for player movement. The float variable “radius” and the Vector3 “center” are used to limit the player’s position to within a circular area.

The player’s movement works similarly to the movement in the Space Invaders prototype, but now in two directions instead of one.

“Input.GetAxisRaw(“Horizontal”)” gets inputs from the A/D or Left/Right Arrow Keys, and “Input.GetAxisRaw(“Vertical”)” gets input from the W/S or Up/Down Arrow Keys.

The movement inputs are stored in a Vector2, which is then used to set the velocity of the Rigidbody2D component of the object, being multiplied by the speed variable and Time.fixedDeltaTime to account for differing frame rates. If the player is moving, a coroutine will start in order to play footstep sound effects, with a boolean variable “playingFootsteps” to delay the next sound by a short time. Then, the same system used to bound the movement of the cursor crosshair is used to ensure the player stays within the bounds of the circle.

The player’s shooting works by checking each frame if the left mouse button has been clicked. If it has, the playerShot function from a function in the scr_GameControl script (assigned to the gameControl variable at the start of this script) is called, and if it returns true, the generateBullet coroutine is called in order to fire. If the mouse button is not clicked, the function will check if the R key has been pressed. If it has, if the player has less than 6 ammo remaining in their gun, the player’s ammo will be set to 0, and the callReload function from the game control script will be called to reload the gun.

The generateBullet coroutine simply instantiates the bullet prefab at the end of the gun, where an empty game object is placed with the scr_PlayerShoot script attached, and fires by itself using a script attached to the bullet prefab.

Player Bullets

The OnEnable function runs when the object the script is attached to is created.

When the player fires a bullet, the bullet immediately finds the position of the player’s cursor at the time it was created. It then calculates the direction it needs to move to go towards the cursor, and sets its velocity in that direction. This veloctity only needs to be set once, as there is nothing slowing the bullet, and if it collides with an enemy, it will be destroyed anyway, so its movement won’t be slowed by anything.

Every frame, the bullet checks whether or not it has reached the edge of the circular area, destroying itself if it has.

Game Controller

playerShot()

The playerShot function is used to determine whether or not the player is able to shoot when they click the mouse button, before firing a bullet. When called, it checks the ammo integer. If it is greater than 0, the integer is lowered by 1 and the ammo display on the UI is updated. It then checks if the ammo count now equals 0. If it does, the callReload function is called to reload the gun. Either way, the function then returns a value of true, allowing the function that called it to continue and create a bullet object. If the ammo value is not greater than 0, the function returns false, meaning that a bullet will not be created.

Reloading

The callReload function is used only to play a sound effect for reloading and start the Reload coroutine. The coroutine updates the ammo counter to show that the player is reloading, waits for 1.4 seconds, then sets the ammo integer to 6 and updates the ammo display again.

Health

When the player collides with an enemy or projectile, the healthDown function is called. This lowers the health integer by one, updates the health display, and checks whether the health integer now equals 0. If it does, the player object is destroyed, and the GameEnd coroutine is started.

The GameEnd coroutine restores the cursor to the screen, waits for 1 second, ends the music loop, and loads the scene of the end screen.

Score

The addScore function, when called upon the player defeating an enemy, simply increases the score integer by the value specified when the function is called, and updates the score display to show the new value.

Enemy Spawning

The variables created at the start of the scr-SpawnEnemy script.
The start function, which calls the spawnControl coroutine.
The start of the spawnControl coroutine.

Enemy spawning is handled by a large coroutine, which uses a while loop to continually spawn enemies as long as the keepSpawning boolean is true. The coroutine waits 1 second before beginning the while loop, to add a pause to the start of the game to let the player prepare slightly.

First, the coroutine randomly selects which of the 4 available spawn points the enemy will be spawned at. It does this by generating a random number from 0 to 3, and then using a switch function to set the spawnPosition vector to the coordinates of the respective spawnpoint. For example, if the Random.Range(0,4) command generates the number 2, the switch function will run the lines nested below “case 2:” (line 39). The break command then exists the switch, continuing to the next part of the coroutine.

The coroutine then proceeds to generate a particle object on the spawn point, as well as the enemy. The enemy is selected from a list of game objects attached to the script, which contains all 4 enemy types. The “enemies[enemyType]” phrase selects the object from the enemies list corresponding to the value of the integer enemyType (if enemyType = 0, it will choose the first. If it = 1, it will choose the second, etc.). The colour of the generated particle object will then be set to the colour of the sprite of the enemy, in order to make the particles appear in the same colour as the enemy generated, without needing to create a prefab for each possible colour of particle and load the correct one with the specific enemy. There is then a pause for an amount of time specified by the timer variable, after which the “enemiesSpawned” integer increases by one.

Finally, the coroutine randomly selects the next type of enemy to spawn based off of how many enemies have already spawned. If there have been 7 or less enemies spawned, the value of enemyType will not changed. If the value is higher than 7, it will be randomly generated depending on the value. For example, if between 14 and 21 enemies have been defeated, a random number from 0, 1, and 2 will be generated, meaning either the first, second, or third enemy type could potentially be spawned. Then, if the timer float variable is greater than 1, it is lowered by 0.02, meaning that enemies will gradually start to spawn faster and faster as the game goes on, to a maximum of one every second.

The inspector for the scr_SpawnEnemy script component, showing the list of enemy prefabs that can be spawned by the script.

Enemy Projectiles

The script for the fire wizard’s projectile. It functions like the player’s bullet, moving towards the player instead of the cursor.

Both the fire and nature wizards have projectiles that they fire at the player. The fire wizard’s projectile works the same way as the player’s bullets – when fired, it finds the player’s position at the moment it is created, and travels in a straight line directly in that direction until it either collides with the player or passes the edge of the circular area.

The script controlling the enemy bullet’s collision. If it collides with an object with the “Player” tag, it will call the healthDown function from the game control script and destroy itself, creating a particle effect.
The script that creates the nature wizard’s projectiles.

The shooting for the nature wizard is slightly more complicated – instead of just one projectile firing in a straight line towards the player, there are two extra projectiles, each firing at a 45 degree angle to the player, as well as the main one going straight towards them. This involves calculating the angle to the player from the wizard when it fires, and then adding/subtracting 45 from it to get the angle the other projectiles need to fire at.

The script for the nature wizard’s projectiles that makes them travel according to their rotation when they are instantiated, instead of in a straight line towards the target like all other projectiles in the game.

The scripts for the bullets themselves then need to make them travel straight according to their rotation, instead of simply moving in a straight line towards the player’s position at the moment they are instantiated.

Categories
Game Design and Prototyping

Prototype 2 – Space Invaders

Link

https://awetton.itch.io/snow-problem

Overview

The in-game display.

This game is a version of space invaders where you play as a campfire shooting fireballs to melt falling snowflakes before they can reach the ground. The player has 3 lives, and upon losing them all by letting 3 snowflakes reach the bottom, the game ends, displaying the player’s score and letting them play again.

Animations

The animation panel in Unity.

I used Unity’s built-in animation system to create a simple looping animation for both the player’s campfire, and the fireball projectiles.

Main Menu

The game’s start menu.

The start menu is very simple – just the game’s title, a background, the animated player sprite, and a button which, when clicked, takes the player to the main game’s scene, beginning the game (as well as ending the audio which plays on loop on this screen, and also playing a sound for the button).

The script for the start button. It also contains code for the audio in the scene).

Game Over Screen

The game over screen.

The game over screen is very similar; the only notable difference in terms of functionality is the score display. Upon losing all 3 lives, the player’s score – which is stored in a “static” integer variable, allowing it to be accessed by any script more easily without needing to access the object that script is attatched to (which would be much more complicated as the relevant object is no longer accessible when a new scene is loaded) – is displayed in a Text Mesh.

The script to display the player’s score once they have lost the game.

Player Behaviour

The variables established at the start of the player behaviour script.

Both the movement and shooting in the game are controlled in the same script. For movement, only one float variable is created at the start of the script, which is for the player’s speed, as well as a variable to store the information about the character’s Rigidbody2D component, which allows for manipulating the velocity of the object to make it move across the screen. For shooting, a GameObject variable is needed, which is filled in the Inspector with the prefab for the fireball, as well as float variables for the fire rate and the time until the next bullet can be fired. There is also a variable to store the sound for the player’s fireball.

The script viewed in the inspector – the “bulletFired” GameObject variable has been manually specified as the “obj_bullet” prefab.
The start function simply specifies the “rb” Rigidbody2D variable to interact with the objects own Rigidbody2D component, and specifies the specific sound from the attached FMOD project.
The update function, which is called every frame.

The update function is split into two sections. The movement section first uses Unity’s built-in input system to check for any horizontal inputs – the A/D keys or the left/right arrow keys – and assigns the returned value (-1 for left, 0 for none, 1 for right) to a new float variable labelled “moveH”. A Vector2 variable called “movement” is then created, and set to (moveH, 0) – a horizontal component of the previously assigned moveH, and no vertical component, as the character only ever moves horizontally. Then, the velocity in the Rigidbody2D component is assigned to the movement vector multiplied by both the speed and “Time.fixedDeltaTime”, which ensures that the object’s speed will be consistent on any device even if the framerate is different. Then, the position of the player is forced within the edges of the screen using the “Mathf.Clamp” function, which limits the player’s horizontal position to between -8 and 8 on the x-axis.

The other part of the update function in this script is the player’s shooting. Each frame, it checks if both the fire key is pressed, and if the current game time is greater than the value of the “nextFire” variable. If both of these are true, a bullet object will be created at the player’s current position, which has it’s own script attached to make it move, the specified sound will play, and the “nextFire” variable will be set to the current time plus the “fireRate” variable, meaning another shot cannot be fired until the game time has caught up to the newly generated time.

Bullets

The bullet fired by the player is a prefab, which is a game object that is stored by Unity to be called and created whenever needed, with its own scripts and components attached.

The FixedUpdate function is similar to the regular Update function, but factors in the frame rate, making it more useful for objects with physics.

The script for the bullet is quite simple – once created, it will simply increase its position on the y-axis by adding the premade “Vector3.up” value with the specified speed variable, which is created at the start of the script. If the bullet reaches a y-coordinate of 6, which is beyond the visible range of the top of the camera, it is destroyed, as leaving the bullet to travel forever could eventually result in performance issues as there would be an ever increasing number of bullets that the game has to calculate the position of every frame.

If the bullet’s BoxCollider2D component – which is set to “isTrigger” in the inspector, meaning that the collider has no physics and simply checks for another collider within its space – collides with something, this function checks if the object it collides with has the “Enemy” tag. If it does, it destroys that object, calls the “EnemyDestroyed” function from the scr_gameController script, specifying the “killedByPlayer” parameter of the function to be true (which will be discussed in the relevant section), and then destroys the bullet.

Enemy Behaviour

The enemy behaviour works similarly to the bullet behaviour script, but in reverse – the enemy starts at the top of the screen, and moves downwards on the y-axis, checking each time it moves whether it’s y-coordinate is less than or equal to -3. If it is, it calls both the LifeLost function and the EnemyDestroyed function (specifying a value of false for the killedByPlayer parameter) from the scr_gameController script, then destroys itself.

Game Controller

The Game Controller is an object that does not physically interact with the scene, but instead holds various scripts that make the game function. The main purposes of the game controller in this prototype are to spawn enemies, increase the player’s score, decrease the player’s lives, and trigger the end of the game when the player reaches 0 lives.

Spawning Enemies

The function that calls the SummonEnemy coroutine when needed.
The coroutine that creates the enemy objects when called.

To know when to summon new enemies, the script has two integer variables – “currentEnemies”, which stores the number of enemies currently spawned on the screen, and “maxEnemies”, which is the limit of how many enemies can be on the screen before new ones no longer spawn. If the currentEnemies integer is lower than the maxEnemies integer, a new enemy is able to spawn. There is also a boolean variable called “spawningEnemy” which is used to ensure that enemies are delayed by a short amount of time before the next is spawned. If the criteria fits to spawn a new enemy, the boolean is set to true, and the SummonEnemy coroutine is called. There is also a second part to the update function – every 15 seconds (as specified in the script), the maxEnemies variable is increased by 1, meaning more enemies can be on the screen at one time, increasing the difficulty of the game over time, as well as making the enemies spawn faster.

The coroutine first chooses where to spawn the enemy by setting the x-coordinate of a new Vector3 variable to a random value between -7 and 7, with 2 decimal places to make it slightly more varied than simply picking one of approximately 15 valid integers. The y-coordinate is set to 6 in order to spawn the enemy slightly off the top of the visible screen, and the z-coordinate is irrelevant as the game is 2D. Then, the enemy prefab is created at the specified position, and the “currentEnemies” variable is increased by one. The coroutine then waits for between 1 and 4 seconds, which decreases as the game goes on due to the difficulty increase in the update function mentioned previously.

Score

The function that is called whenever an enemy is destroyed.

The EnemyDestroyed function has a boolean parameter “killedByPlayer”, which is specified whenever the function is called. The function first reduces the number of current enemies by 1, then checks whether or not the killedByPlayer boolean is true. If it is, the score integer is increased by one, and the displayed text is updated, as well as playing a sound.

Lives

When the LifeLost function is called when an enemy reaches the bottom of the screen, the lives variable is reduced by 1. If that reduces the number of lives to 0, the “GameEnd” coroutine is called, ending the game. Otherwise, a sound effect is played to indicate a life was lost, and then the text display is updated to show the new number of lives.

The GameEnd coroutine first reenables the cursor, which is disabled when the game starts to avoid being a distraction on the screen. The music loop is ended, playing a sound to indicate the game is over, as well as ending the campfire sound loop. It pauses for 1 second, then switches the scene to the game over screen.

Categories
Game Design and Prototyping

Prototype 1 – Cookie Clicker

Link

https://awetton.itch.io/clicker-clicker

Overview

The display of the game immediately after starting.

For my clicker game, I went in a different direction from the regular cookie-clicker-style idle game, instead basing it on the system used in a game called Antimatter Dimensions. Instead of simply buying an upgrade that increases your cookies, to afford the next upgrade to give more cookies, my game uses a more hierarchical upgrade style. The first level of upgrades – cursors – produce “clicks” (the game’s version of cookies), but the next level, instead of producing a higher number of clicks, instead produces cursors.

The other main change is the way pricing works. The price of an upgrade does not increase every time you buy that upgrade. Instead, it counts up to 10, and once the 10th upgrade of that type has been bought, the price increases, and the amount that upgrade produces is doubled (for example, once you buy 10 total cursors, they will become 100x more expensive, and will now each produce 2 clicks per second, instead of 1). There are also upgrades that can be purchased to increase the multiplier for buying 10 of an upgrade by 0.2 at a time (e.g. buying the upgrade for cursors once will mean that for every 10 cursors you buy, the amount of clicks they produce will be multiplied by 2.2x instead of 2x).

Click Detection

The script to detect when the player clicks anywhere on the screen.

Instead of clicking on a specific object to generate clicks, instead 1 click is produced every time the player clicks anywhere, playing a sound whenever this happens. The player’s clicks quickly become irrelevant as the automated production increases quite rapidly and there are no upgrades to generate more clicks per click. The script checks constantly for if the left mouse button (signified by the 0 in “GetMouseButtonDown(0)” on line 18) is pressed, and if so, increases the player’s total number of clicks – stored in an float variable in the script to display clicks (next section) – by 1.

Displaying Clicks

The text displaying the player’s number of clicks.
The script to change the value displayed.

The script for displaying clicks is simple – it simply updates the Text Mesh every game update with the new value of clicks after formatting it through the text formatting script (discussed in the next section).

Text Formatting

An example of the formatting – the number 20,150 has been reformated to 20.15K, making it easier to read.
One of the functions that formats the text in the game.

As the numbers in the game get quite high quite quickly, I decided to add a way to format the text. Instead of showing longer and longer numbers (e.g. 1000000 for 1 million), I made a script that would shorten these to a smaller number followed by a letter to represent the power (K for thousands, M for millions, etc.). Each function in the script would take an inputted float value, pass it through the log10 function, and see which multiple of 3 the value fell above. For example, if the number 3,000,000 was inputted, it would first check if 3,000,000 log 10 was greater than or equal to 9, which would return false (3,000,000 log 10 = 6). It would then check if the number log 10 is greater than or equal to 6 – in this case, this would return true, and the program would continue with the nested code. The number is divided by 10^x, where x is the value checked by the logarithm (in this case, 10^6, or 1 million). The result is turned into a string, and a letter is added on to represent the size of the number (as previously mentioned – K for thousands, M for millions, B for billions). The code only formats up to the billions, as the game is just a prototype, meaning the likelihood of numbers much higher than that being reached is low – but the function’s logic could be expanded to much higher values very simply.

There are 3 separate functions within the script, each formatting the outputted string slightly differently. The first, “FormatTextClicks”, returns the integer value of the number for values below 1000, and then displays any higher values to two decimal places. This felt like the best way to display the player’s total clicks, as the decimal places on higher values give more visual feedback showing click production. The second function, “FormatText0DP”, simply returns the value with no decimal places. This is used for displaying the prices of upgrades, as well as the number of each upgrade the player has, as the decimal places are unnecessary for these. The final function, “FormatTextProd”, is used to show the amount each upgrade is producing, and displays the number rounded to 1 decimal place.

This script does seem to have some flaws – particularly, the 0DP version does not seem to correctly display upon reaching higher values. This, along with increasing the maximum value that can be formatted in the script, is something that I could work on to take the project further.

Buying Upgrades

The scripts to buy upgrades are effectively the same, with the only difference being which type of upgrade it increases, and the values of the prices and how much they increase by.

The start of the script to buy the first upgrade. Each needs access to various other scripts (the click display script in order to edit the total number of clicks, the text formatting script to format text within the upgrade, and the script to increase the multiplier for the upgrade).

A lot of variables are created at the start of these scripts. The first 3 are references to other scripts that are needed to either edit variables from, or call functions from. The three TextMeshProUGUI variables are used to edit text on the UI, and the various float variables have different uses throughout the script, and will be mentioned more as they show up.

The Start() function is called at the very start of the program, while the Update() function is called every time a new frame is drawn.

The update function first sets the text on the button to buy the upgrade, displaying the cost of the upgrade (format.FormatText0DP(costOfProd, as well as the number of the upgrade that the player owns (format.FormatText0DP(numOfProd1)). Then, it calculates the Efficiency of the upgrade – equal to:

2 + (0.2f * the number of multiplier upgrades purchased)

For example, at the beginning of the game, this value is 2, as no multiplier upgrades have been purchased. After one is purchased, the value becomes 2.2, then 2.4 with two purchased, and so on. This value is then used in the next line, which calculates the amount that the upgrade will produce each second. This is equal to:

The number of the upgrade owned * (1 * (the efficiency ^ the upgrade’s level))

The efficiency is calculated by the previous equation, and the upgrade’s level is equal to the number of times that the player has bought 10 of that specific upgrade, plus 1, as it starts at level 1 (after buying 10 of an upgrade, the upgrade is level 2. Another 10 increases it to level 3, etc.). The value being multiplied by 1 has no specific effect, and could most likely be removed.

The function that is called when the upgrade button is clicked.

The next function is used to buy more of an upgrade. It is assigned through Unity’s built-in UI system to be called whenever the button is clicked. First, it checks whether or not the total number of clicks the player currently has is greater than or equal to the price of the upgrade. If it is not, then the function ends there. If it is, then it proceeds to purchase the upgrade.

First, the price of the upgrade is deducted from the total number of clicks. Then, both the number of the upgrade and the amount purchased out of 10 are increased by one. If the amount purchased out of 10 is increased to 10 by this, then the cost is multiplied by a set value (in this case, 100 for the first upgrade), the amount purchased out of 10 is reset to 0, and the upgrade’s level is increased by one. Then, the text on the button is updated to show the new number purchased out of 10, the production per second is updated to the new values (which is mostly unnecessary, as the amount is updated every frame – however, it ensures that when the text is updated, it displays the correct amount), and the “UpdateText” function is called to display the details of the upgrade at the bottom middle of the screen.

The function that modifies the text at the bottom of the screen which displays upgrade information. Line 62, which is cut off in the screenshot, reads “prod1InfoText.SetText(“Produces a total of ” + format.FormatTextProd(prod1PerSecond) + ” Clicks per second\nEach Cursor produces ” + format.FormatTextProd(1 * Mathf.Pow(prod1Efficiency, prod1UpgradeLevel)) + ” Clicks per second”);”

The “OnMouseEnter” and “OnMouseExit” functions are assigned, similarly to the “Prod1Clicked” function, to built-in systems for Unity’s UI buttons, meaning they automatically get called when the cursor hovers over the button, or when it stops hovering over it. These are used to edit a Text Mesh at the bottom middle of the screen, which is changed to display information about the respective upgrade that is hovered over. However, there is an issue where hovering over the text on the button does not seem to count as hovering over the button, leaving only a small amount of space on the button that will actually show the information. I could not find any way to fix this, but it would need to be addressed if the project was taken any further as it is quite inconvenient to the user’s experience.

Upgrade Auto Generation

The script that allows upgrades to auto generate the upgrade below them, or clicks for the lowest level upgrade.

Like the script for buying upgrades, the auto generating script is practically identical for each ugprade. The main difference is what is being generated – the script shown is for cursors, the lowest level upgrade, and so it generates clicks – but the higher level upgrades instead produce the upgrade one level below them. The two scripts required are the script for purchasing the current upgrade, as well as the script for the upgrade below (or in this case, the script containing the total number of clicks).

The auto generation script for cursor farms – instead of the “scr_ClickDisplayUpdate” script, it requires the “scr_BuyCursors” script to increase the current number of cursors.

The script uses a coroutine to be able to constantly run alongside various other scripts and functions without impacting what the user is doing. Every frame, it checks if the boolean variable “Prod1Generating” is set to false. If it is, that means the coroutine is not currently running, so it sets the variable to true, then starts the “Prod1Generate” coroutine. The coroutine then increases the number of the relevant variable (number of upgrades or total number of clicks) by the amount the current upgrade produces per second, divided by 10, and waits 0.1 seconds before setting the “Prod1Generating” boolean back to false, allowing it to be called again the next frame. By increasing the value by a tenth every 0.1 seconds instead of the full value every second, it makes the displayed value increase more quickly and constantly, instead of jumping up each second, which is nicer for the player to view.

Upgrading Upgrades

The final type of script in the game is the ability to increase the multiplier for buying 10 of an upgrade.

The variables created at the start of the multiplier upgrade.

Once again, this script uses 3 Text Meshes to display text on the button, as well as when the button is hovered over with the cursor. It also interacts with three other scripts – the click display update and text formatting scripts, as usual, as well as the purchase upgrade script for the relevant upgrade, and has two float variables – one for the cost of the upgrade, and another for the number of times it has been purchased.

Like the Buy Upgrade scripts, the upgrade cost is set at the start of the script, as well as making sure the info text (the text displayed at the bottom of the screen when hovering over the button) is empty, and the button’s text is updated every frame to show the correct values. This is simply done by showing the current efficiency of the relevant upgrade, followed by that value increased by 0.2 to show what the value will increase to when the upgrade is purchased.

Again, like the Buy Upgrade script, when the button is clicked, it first checks that the player has more clicks than the upgrade costs, and if so, removes that many from their clicks, increases the number of upgrades purchased by 1, multiplies the price by a set amount, and recalculates the efficiency of the upgrade that has been increased. It then edits the text on the button to display the new multiplier amount.

The last part of the script is the same as the last section of the Buy Upgrade script – displaying information about the upgrade when the button is moused over.